Welcome to the next level of Tonic!
Tonic’s new Back of the House (BOH) delivers a new user-friendly experience with enhanced features offering restaurants a powerful POS system they can manage from the cloud. To get you started, the Tonic BOH Quick Start Guide has been broken down into key sections of the BOH: Dashboard, Menu, Reports, and Staff for the New Back Office (NBO). You will find step-by-step instructions on how to perform many of the basic and essential functions of the system, including photos and single-page QRG printables for the associated guide.
BOH First Look
- Icons: Tonic has transitioned to a more modern set of icons. Some standard Icons you will frequently see and use are:
- Hover Overs: If something isn’t clear or apparent, hover your mouse cursor over the text to see an additional descriptor.
- Navigation: The new BOH offers improved navigation to get you in and out of the office so you can spend more time with your guests and staff.
Browse Tonic’s Knowledge Base
Find answers quickly using Tonic’s Redesigned Knowledge Base.
Signing In
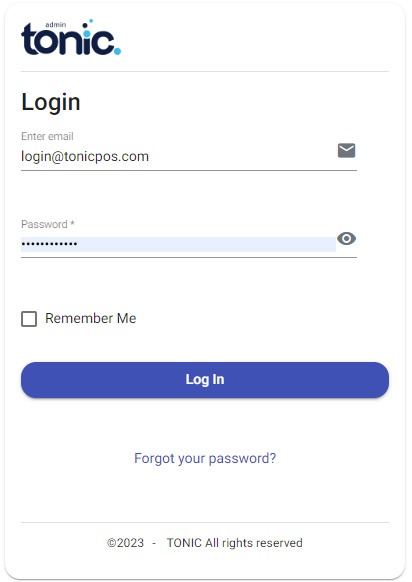
You can log into Tonic BOH using your current credentials.
Dashboard
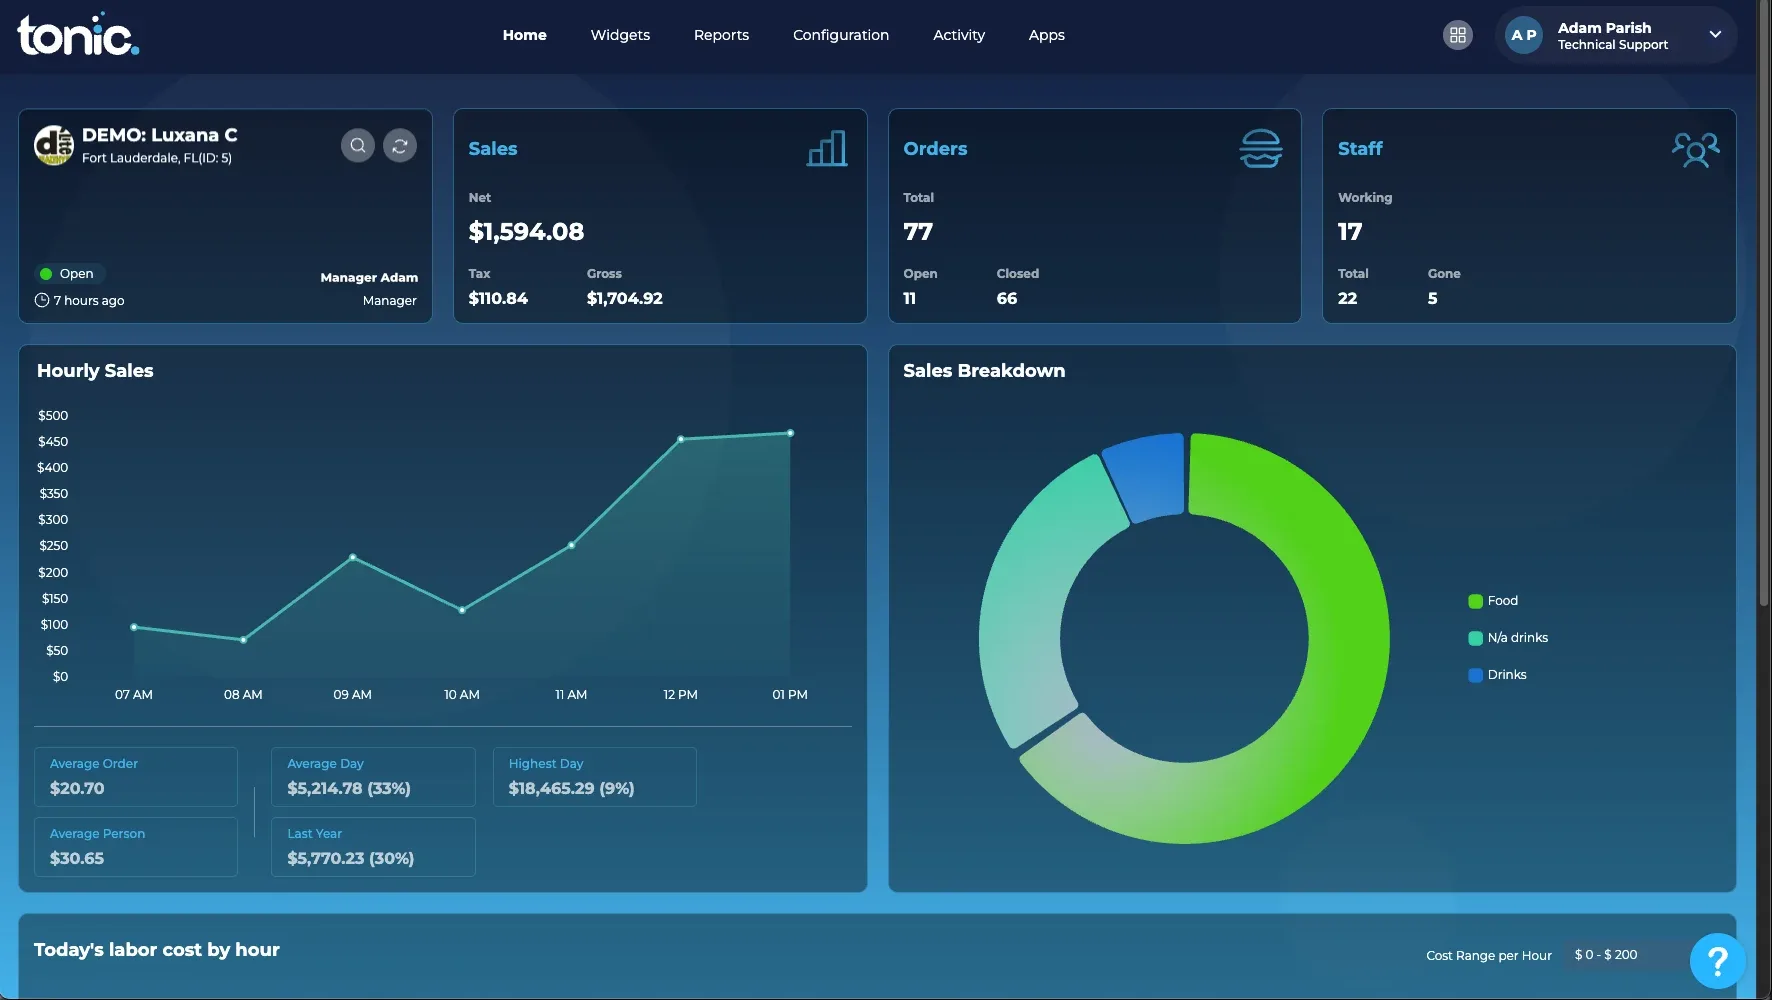
The Tonic POS back-of-house dashboard includes updated visuals and colors along with an improved layout designed to help users quickly and easily understand information about their store. It is designed to provide a clear and comprehensive overview of store operations and performance.
Features of the Tonic Backoffice dashboard include:
- Enhanced User Interface: The dashboard features updated visuals and colors, along with an improved layout to facilitate the quick and easy discernment of store information.
- Key Operational Data at a Glance: The dashboard displays essential information in updated boxes, which include details such as who opened the store, net sales, taxes, total orders, and a staff breakdown.
-
- For example, the dashboard shows Net sales, with Tax leading to Gross sales.
- The Orders section indicates a Total number of orders, with some currently open and others closed.
- The Staff breakdown displays how many staff are working out of a total number, with some having completed their shift (“Gone”).
- Detailed Sales and Performance Insights:
- A visual Hourly Sales graph tracks sales activity throughout the day, showing trends across hours.
- Important metrics are provided, such as Average Order value, Average Person spend, Average Day sales, and the Highest Day sales.
- A Sales Breakdown is presented via a pie chart, categorizing sales into segments like “Food,” “Retail,” and “Drinks”.
- The dashboard also includes a section for “Today’s labor cost by hour”, which is accompanied by an indicator for “Cost Range per Hour”.
Reports
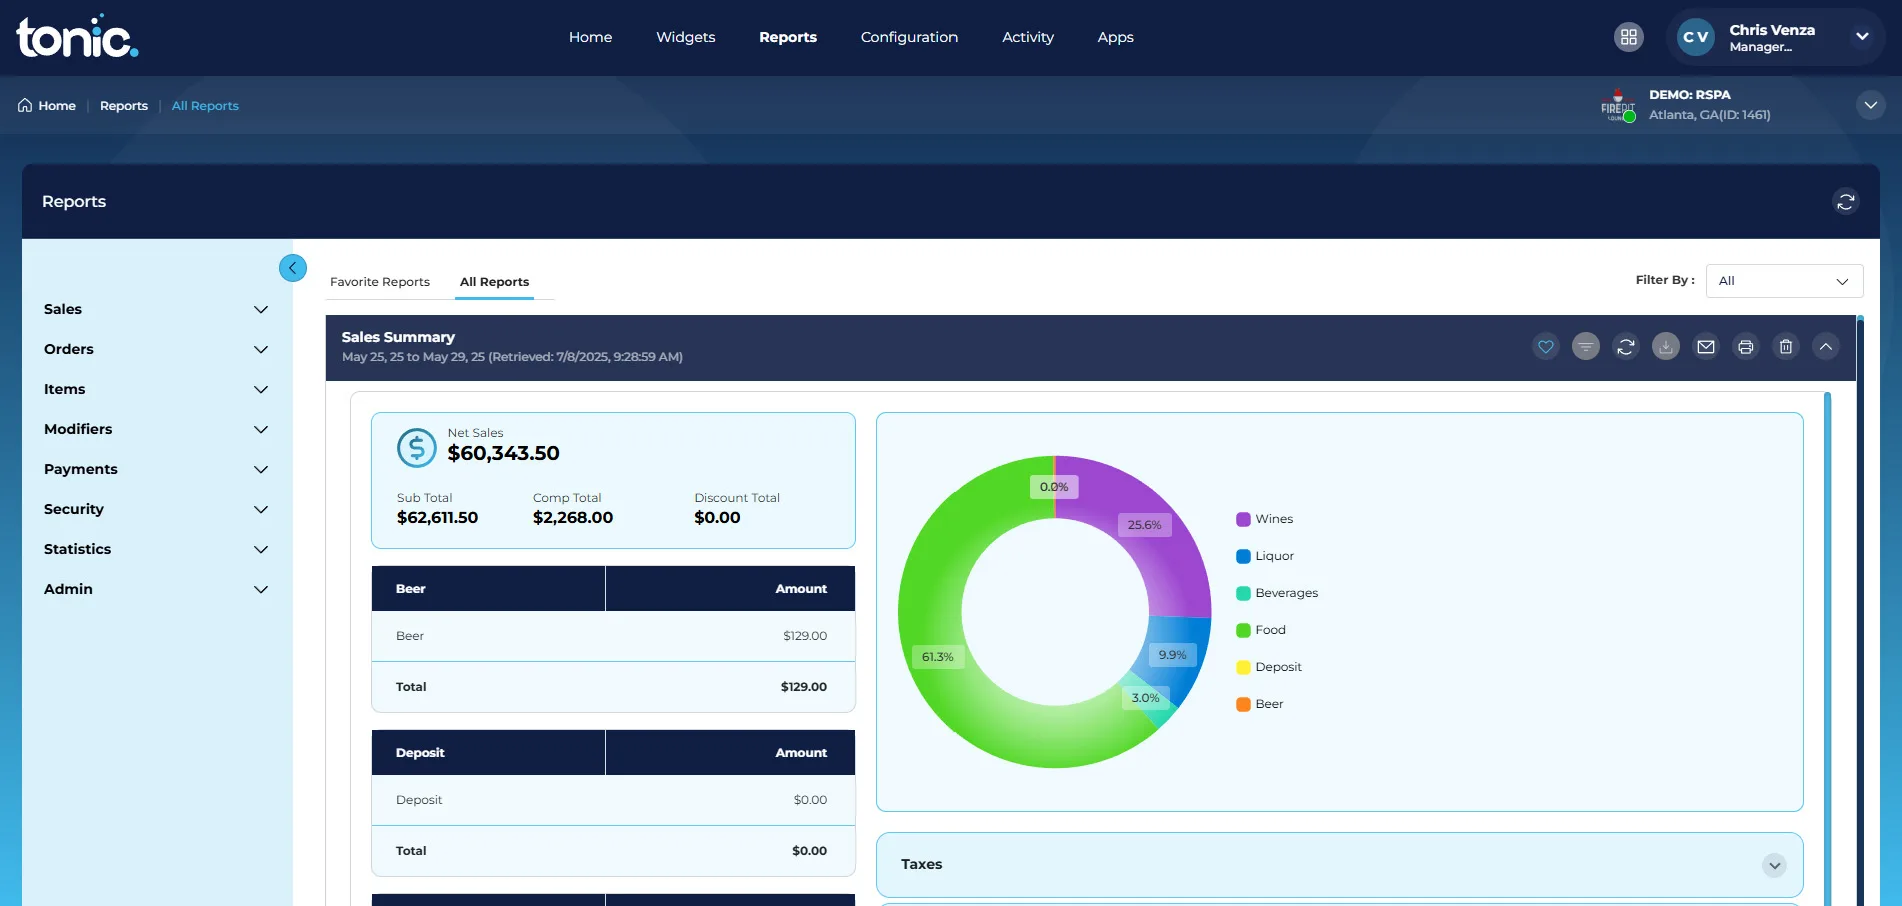
Tonic’s Reporting enhances the user experience by providing data that is fast and easy to find. By modernizing the user interface and providing user-level customization tools, Tonic has streamlined the way users locate, save, and distribute critical information from their point-of-sale system.
Key Features of Tonic Reporting Include:
- In-Report Filtering: A notable improvement is the ability to apply report-specific filters after the main report has been generated. This new approach allows for quicker initial report generation and offers a more enhanced drill down workflow.
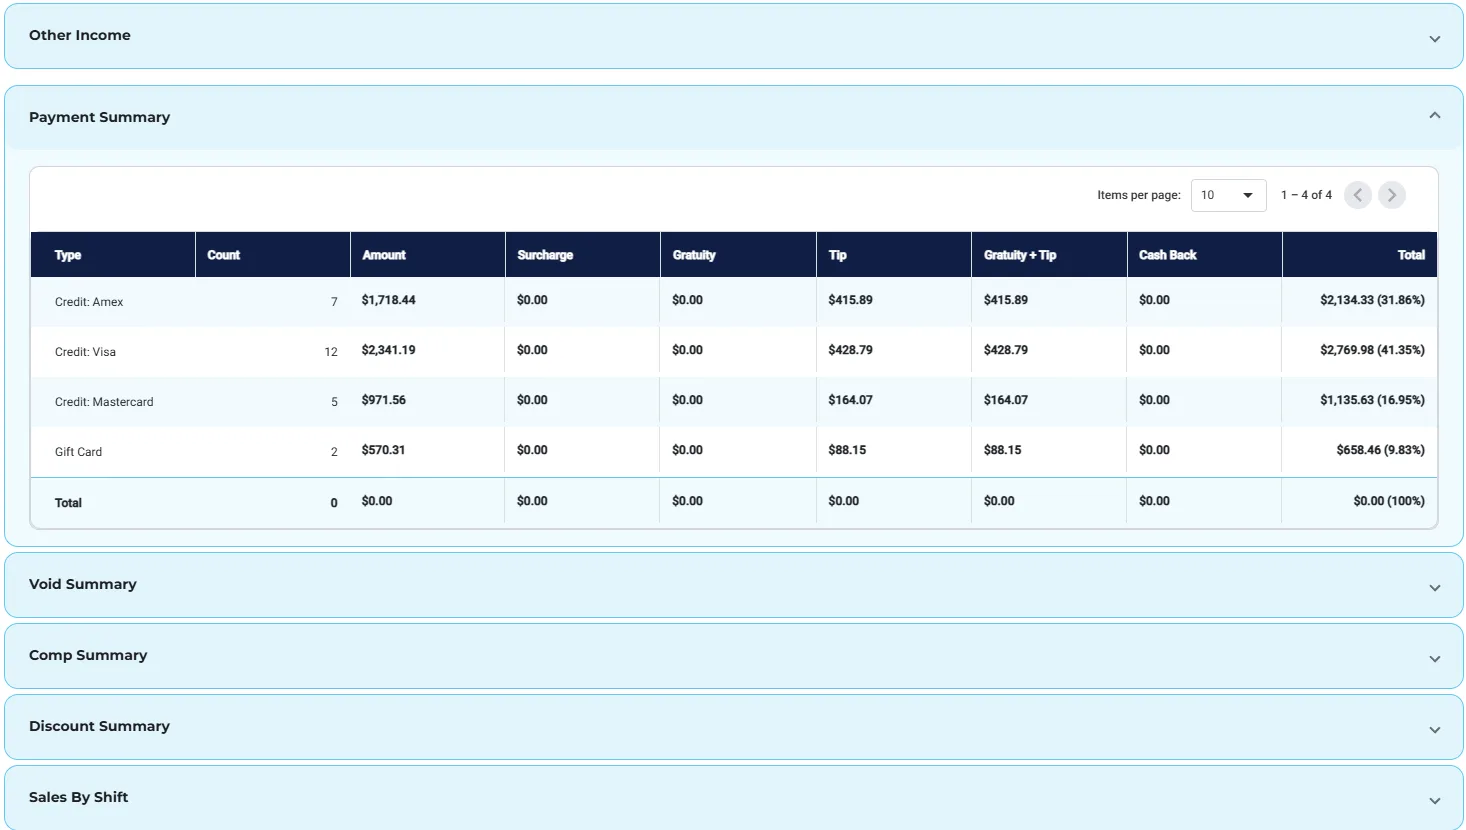
- Visual Organization: Many reports now feature an accordion-type view, allowing users to expand and collapse sections for better information management, with all sections collapsed by default.
-
- Flexible Export Options: Reports can be exported as PDFs or emailed (which automatically expands all sections), or exported to CSV for compatibility with external tools such as QuickBooks.
- Enhanced Visualizations: Some reports now include graphs for better data representation and quicker insights.
- Favorite Reports: Users can save frequently accessed reports as “favorites” by clicking a heart icon. These favorited reports serve as a default landing page for quick access.
- Dynamic Favorites: Favorited reports retain their filtering settings, including date ranges. For example, a report saved as a favorite for “today” on Monday will automatically display Tuesday’s data when refreshed on Tuesday.
- Historical/Favorite Reports Filter: A dedicated filter has been added to help users search and narrow down their list of favorite or historical reports, for instance, to view only sales reports.
- Initial Drill-Down Capability: Some reports, such as the Order Detail report, now include basic drill-down functionality. Users can click on elements like order names to open a modal. This modal provides more detailed information, including batch details, items on the order, sales taxes, and payment information, which can also be exported, saved, or printed.
Additional Resources/Knowledge Base Articles
This video provides a comprehensive guide on managing menu categories within the Tonic’s back of the house. It details how users can access, create, edit, organize, and manage various aspects of their menu, including categories, individual items, combo items, sections, and additional charges.
Topics within this video include:
- Accessing Menu Categories
- Creating New Menu Categories
- Rearranging Menu Categories
- Searching and Filtering Menu Categories
- Managing Sections Within a Menu Category
- Managing Additional Charges
- Editing Menu Category Details
- Managing Items Within a Menu Category:
- Adding New Menu Items
- Creating New Combo Items
- Rearranging Items
Modifiers
The Tonic Back of House system utilizes modifiers as a crucial configuration tool to customize items and their presentation within the point-of-sale (POS) system. Their primary purpose is to allow users to define and manage various attributes for items, which influences how these items are sold, displayed, and prepared. Essentially, modifiers enable detailed customization and control over product offerings, affecting everything from pricing and preparation instructions to how items are presented to customers, both in-store and online.
Topics within this video include:
- Access and Management
- Adding New Modifiers
- Customization Options:
- Editing Existing Modifier
Modifier Sets
Modifier Sets in the Tonic Back of House application are a distinct but related concept to the individual “modifiers” we previously discussed.
The Tonic Back of House application utilizes modifier sets as a configuration tool to organize and manage groups of individual modifiers, influencing how they are presented and used within the Tonic front-of-house POS application. Their primary purpose is to allow users to define, group, and arrange existing modifiers, along with setting display and usage rules for these groups. Essentially, modifier sets act as containers or categories for various modifiers, impacting their appearance, requirements, and ordering in the point-of-sale system.
Topics within this video include:
- Purpose and Function
- Access and Management
- Creating New Modifier Sets
- Editing Existing Modifier Sets
- Controlling Sort Order
Additional Resources/Knowledge Base Articles
Pre Modifiers
Premodifiers in Tonic’s system are designed to cover any situation in a real-world restaurant environment. Their fundamental purpose is to allow for highly flexible customization and modification of menu items. For instance, you can create premodifier groups for various verticals like cocktails, sandwiches, hamburgers, or even specific items like pizza (left half, right half).
The functionality of premodifiers includes:
- Configuration Options
- Online Ordering Name
- Kitchen Name
- Display as Prefix or Suffix
- Online Ordering Availability
- Pricing Variations
- Actual Pricing Field
- Creation and Grouping
- Assignment to Modifier Sets
Additional Resources/Knowledge Base Articles
Sales Groups
Sales Groups categorize individual menu items (e.g., “Entree,” “Burrito, Pizza, Hamburgers”) and their modifiers. Parent Sales Groups offer a higher level of organization, grouping related Sales Groups (e.g., “Food” for “Alcohol,” “Retail”). This hierarchy enables both granular and consolidated reporting.
The strategic implementation of Sales Groups and Parent Sales Groups is crucial for several reasons:
-
Accurate Reporting: By categorizing sales data precisely, Tonic can generate reports that accurately reflect sales performance for specific categories of items. This allows for detailed analysis of profitability, popular items, and areas for improvement.
-
Enhanced Financial Analysis: The structured categorization facilitates in-depth financial analysis. Businesses can easily track revenue generated from different date ranges, sales groups, or even specific types of modifiers.
-
Streamlined Menu Engineering: The data taken from Sales Group and Parent Sales Group reports can be invaluable for menu curation, guiding decisions on pricing, promotion, and item placement.
-
Simplified Data Tracking: The hierarchical structure makes it easier for users to navigate and understand complex sales data, whether they need a high-level overview or detailed insights.
Topics within this video include:
- Creating Sales Groups
- Assigning Items to Sales Groups
- Utilizing Sales Groups in Menu Rules
- Benefits of Sales Groups
Additional Resources/Knowledge Base Articles
Combo Groups
In the Tonic POS system, Combo Groups are a powerful menu management feature that allows restaurants to bundle multiple menu items together to be sold as a single, selectable meal at a set price. This functionality is essential for creating classic “combo deals” like a “Burger, Fries, and a Drink” or a “Soup and Salad” lunch special.
At its core, a Combo Group in Tonic POS is a collection of predefined menu items that are offered to the customer as a package. Instead of a server or customer having to select each component of the meal individually, they can choose the single combo item, which then prompts for the necessary selections within that group.
Here are the key aspects of Combo Groups:
-
Simplified Ordering: Combo Groups streamline the ordering process significantly. For a “Value Meal,” an employee can select the single combo button, which then presents the available choices for each component (e.g., choice of sandwich, choice of side, choice of beverage). This makes order entry faster and reduces the potential for errors.
-
Flexible and Customizable: When setting up a Combo Group, you have the flexibility to define which items are included. You can create different groups for each component of the combo, allowing for a mix-and-match approach. For example, a “Sandwich Combo” could pull options from a “Main Sandwiches” item group and a “Side Dishes” item group.
-
Set Pricing: A primary function of a Combo Group is to offer a special price for the bundled items that is often less than the total cost of purchasing each item separately. This incentivizes customers to order more, potentially increasing the average check size. You define this final, set price for the entire combo within the back office.
By utilizing Combo Groups, restaurant operators can create attractive meal deals, improve the speed and accuracy of service, and ultimately provide a better experience for their customers while driving sales.
Topics within this video include:
- Creating a New Combo Group
- Adding Items in a Compbo Group
- Comfiguring Combo Settings
- Saving and Testing
- Editing Existing Combos
Additional Resources/Knowledge Base Articles
Payments
UI / Table Layout
UI is where you will create your custom table layout and edit any existing tables in your store. Tables also take into account Areas for ease of reporting.
* Click to enlarge image
Bulk Uploader
Tonic’s bulk uploader feature is designed to significantly simplify the process of building and migrating menus, as well as managing other data like employee information. It addresses two main scenarios: new restaurant buildouts and migrating data from existing, potentially older, systems.

For new buildouts, Tonic provides a specific Excel template (blank or sample) that users can download and fill out. Using this template allows for automatic mapping of data fields (like category names, availability status) once uploaded, streamlining the configuration process. The initial phase of the bulk uploader supports critical menu configuration elements such as menu categories, modifiers, modifier sets, parent groups, items, and labor data.
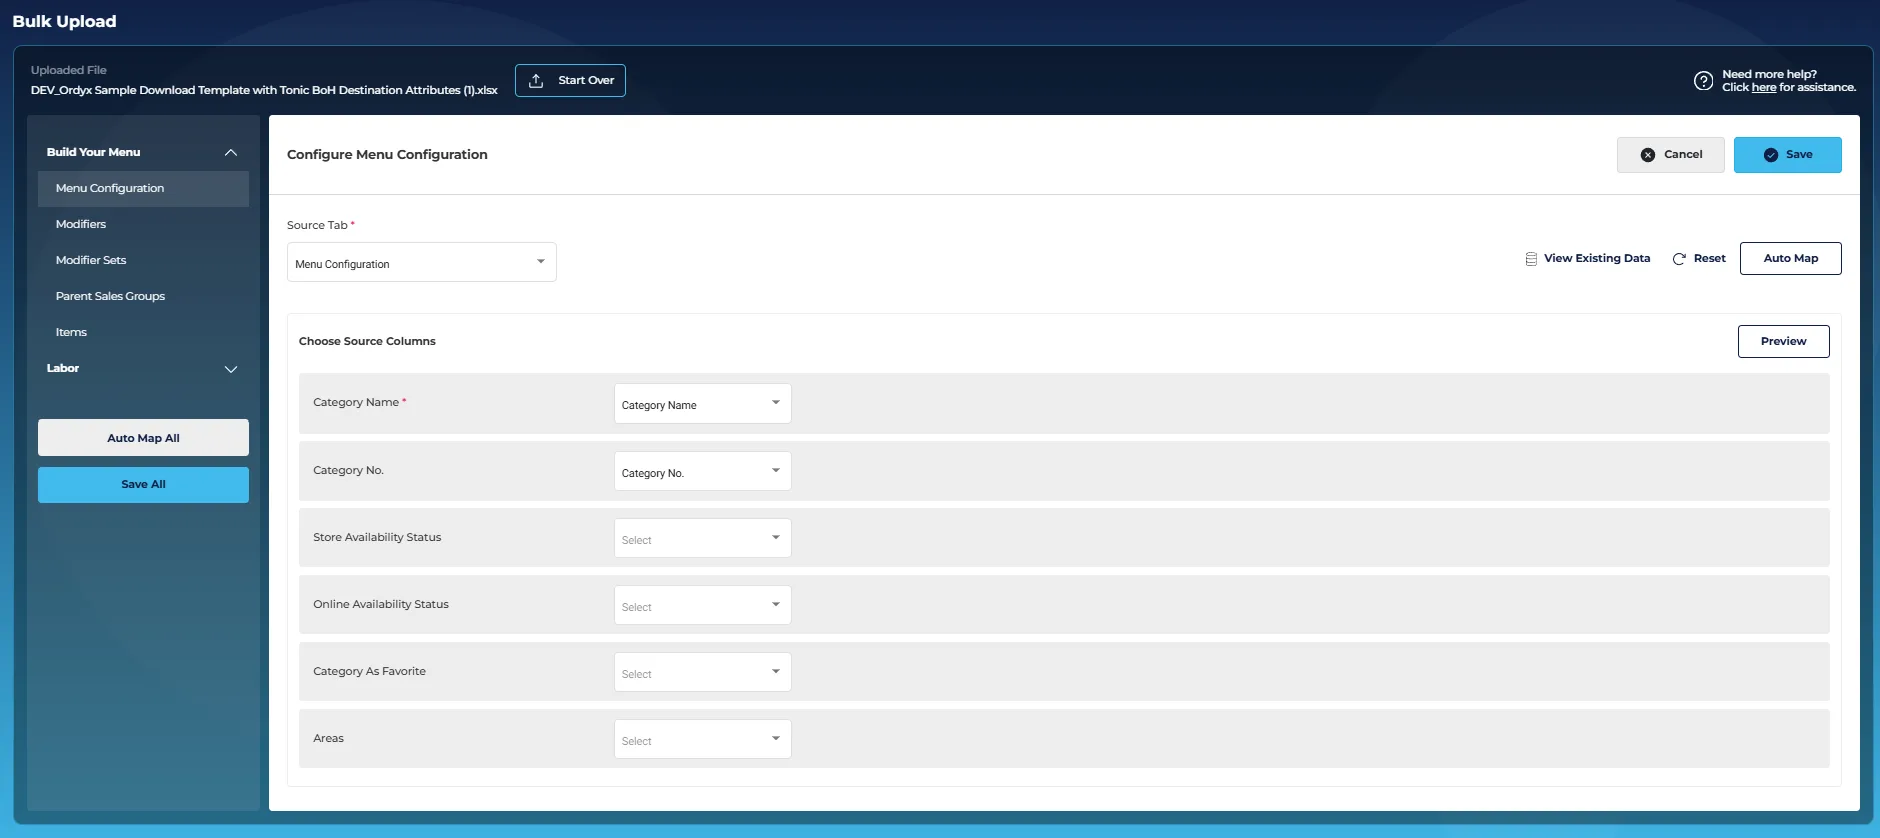
A key innovation is the uploader’s ability to ingest data from virtually any existing Excel spreadsheet, regardless of its original system or how it’s formatted. This means users do not need to use Tonic’s template if they have an existing spreadsheet. Even if column names or tab structures differ, the system provides a mapping screen where users can manually associate their spreadsheet’s fields with Tonic’s internal data fields. It shows visual cues (yellow/red exclamations) for unmapped items. This flexibility aims to make migration to Tonic extremely easy, allowing partners and users to transition their menus and other data without extensive reformatting. The tool also includes features to view existing data before upload to prevent accidental overrides.
Important Details About Bulk Uploader:
- Solving a Core Problem: The bulk uploader is designed to make menu building significantly easier for internal teams (support, implementation) and partners who frequently build or demo menus. It tackles the complexity of multi-layered menu configurations found in any back-of-house system.
- Two Primary Use Cases:
- New Restaurant Buildouts: For brand new restaurants starting from scratch, Tonic offers downloadable blank and sample Excel templates specific to Tonic. Using these templates enables an automatic data mapping process upon upload, streamlining initial setup.
- Effortless Migration from Any System: A powerful feature is the ability to upload any existing Excel spreadsheet, regardless of its source system or even outdated database. This means no reformatting is required on the user’s end to switch to Tonic.
- Flexible Data Mapping:
- Auto-Mapping with Templates: When using Tonic’s template and consistent naming conventions, the system can automatically map all data fields (e.g., category name, availability status).
- Intelligent Manual Mapping for Custom Spreadsheets: If an uploaded spreadsheet uses different naming conventions (e.g., “menu name” instead of “category name”), the system provides a user-friendly mapping screen. Users can easily manually map fields using dropdowns, with visual indicators (yellow/red exclamations) for unmapped items.
- Comprehensive Data Support (Phase 1): The initial phase supports crucial menu configurations including menu categories, modifiers, modifier sets, parent groups, items, and labor data (employees, roles). Combos were intentionally excluded to keep the tool simple and user-friendly.
- User-Centric Design: The goal was to make the process as simple as possible, avoiding overly complex requirements. Users can also view existing data before uploading to avoid duplicates or accidental overwrites.
- Key Selling Proposition for Tonic: This tool provides a compelling story for partners and potential customers: migrating menus to Tonic is incredibly easy, regardless of their current system or data format. It emphasizes that Tonic can “consume” any Excel spreadsheet, simplifying the transition process.
- Future Enhancements: There are plans to expand the template offerings to include vertical-specific templates for various restaurant types (e.g., bar, fine dining, sushi), further simplifying menu creation.
